The first thing that must be done prior to anyone using this program is to install and configure the 32 bit runtime engine on their PC. The 32 bit runtime engine is not to be installed on a Network, but on each computer that accesses the program on the Network. If the program is installed on a PC for the use by a single person, than the runtime engine is installed on that computer.
Installing the 32 bit runtime engine
First go to http://www.railsoft.com and select Updates. Click on the link 32 Bit Runtime Engine Build ????, (the ???? will be a number), and save the file anywhere on your computer or desktop. The next step it to run the 32 Bit Runtime Engine from your computer.
When installing the runtime engine, allow the files to go where the installation program wants them to go. Never install the runtime engine in the same folder as the program.
The program itself must be in a letter drive and in a folder under that letter. The folder name should not be more than eight, 8, characters in length with no spaces or special characters. Example: c:\rail21
Create a shortcut to the program on your desktop by clicking on the right push button of your mouse and selecting New than Shortcut. Point to the rail21.exe file in the directory where the program is located.
Now click on your shortcut and the main screen of the program will appear as shown below.
The main screen of the program has four selections to choose from, Files, Utilities, Reports, Processing and Help.
The program is setup so that you cannot enter equipment unless you have a lease that you can assign to the equipment. The lease name can be anything from Owned Cars to Storage or an actual lease number that you assign. Likewise, you cannot create a lease unless you have a lessor and a lessee that is assigned to the lease. So, the first thing that is required, it to open the rolodex file and create at least one lessor and at least one lessee. A single company can be both a lessor and a lessee.
From the main menu of the program, select File, Rolodex and the Rolodex screen will appear.
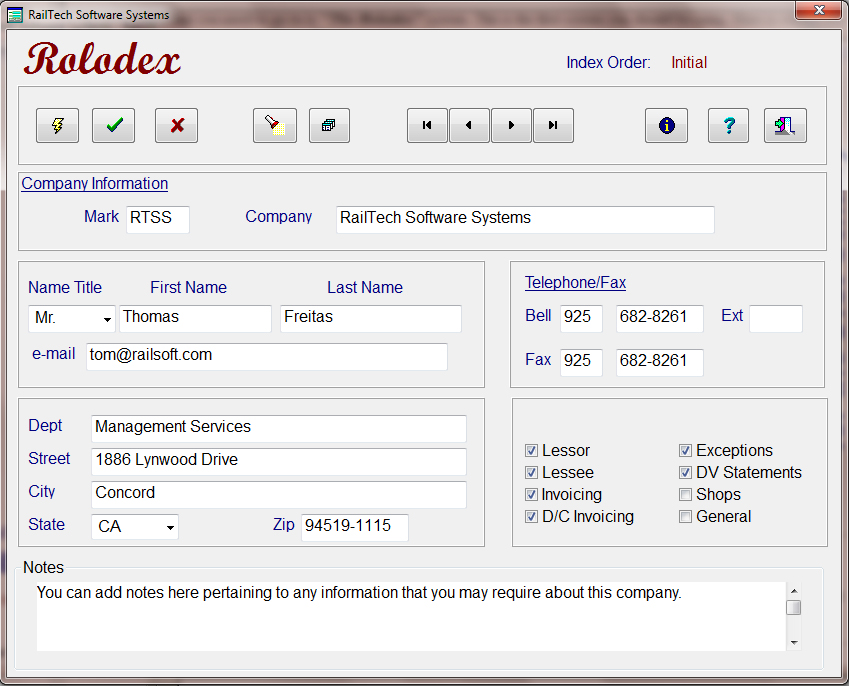
Each company you enter has a unique initial along with a unique responsibility selection. The responsibilities are Lessor, Lessee, Invoicing, D/C Invoicing, Exceptions, DV Statements, Shops and General. This means that each company initial can only appear once for those items with the exception of General. You can enter the initial and all the information multiple times, but only once per responsibility that is checked. You should also enter all the information since this data is also used when creating anything from exception letter, to depreciated value statements and data exchange files.
Once you have assigned at least one lessor and one lessee, you can than start entering leases. From the main menu of the program, select File, Leases, Leases and the screen below will appear. This is the main screen of the lease file.
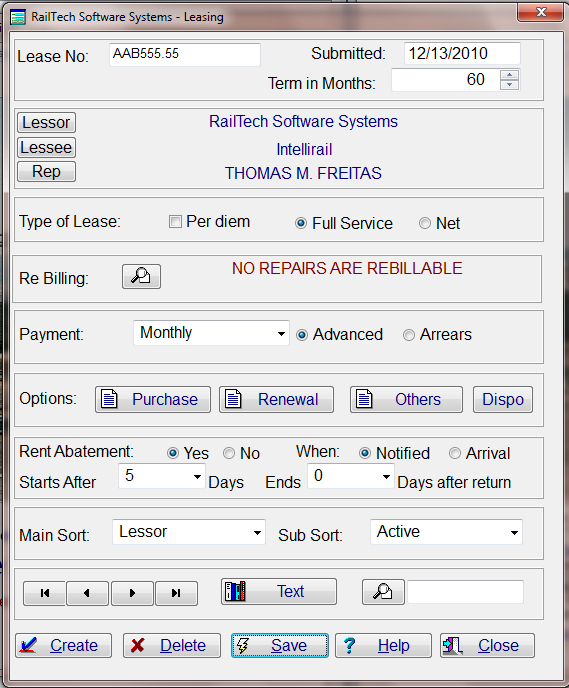
The first field on the left is what your lease number is. As we stated earlier, you can enter anything that you feel is best suited for the lease number. If you have cars that are in storage and not yet assigned to a lease, you could use the lease number of Storage. If you have multiple lessors, than you might use the initials of the lessor with the word storage after the initials. Example: XYZ-Storage. There is no set rule to what you enter for a lease number, but it should make sense to you and others. Of course, if you have an actual lease document and that document has a lease number on it, than you should obviously use that lease number.
Once you have entered your lease number, you should enter the submitted date of the lease and the term of the lease in months. Now you need to select a Lessor and a Lessee by clicking on the buttons that state Lessor, Lessee. When you click on the Lessor push button, all companies that you entered in the rolodex with the responsibility of Lessor will appear. Select the one you want and it will appear on the screen. Click on the Lessee push button and all the companies that you entered in the rolodex with responsibility of Lessee will appear. Select the one you want and it will appear as the lessee.
If you want to assign a representative from your company for this lease, than from the main menu select File, Leases, Company Representative and the screen below will appear.
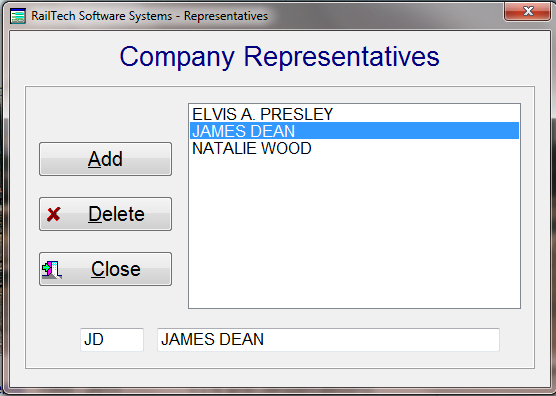
Enter the initials of the person at the bottom of the screen than enter his/her full name and press the Add push button. You can have as many representatives that you require.
In the lease file, if you press the Rep push button, the full list of company representatives appear. Select the one you want for that lease and his/her name will be placed on the lease.
The next item on the lease file is the type of lease this is. If this lease is also a Per Diem lease, than check the box Per Diem. Select between a Full Service Lease or a Net Lease. The next item is for Re-Billing instructions. Regardless of the type of lease, there may be stipulations for re-billing the lessee or lessor. Example; If you are a lessor and you lease out cars to company XYZ with the stipulations that the lessee is responsible for all hatch covers and gates on covered hoppers where the why made code is not equal to 27, corrosive. By pressing the push button for re-billing instructions, the following screen appears.
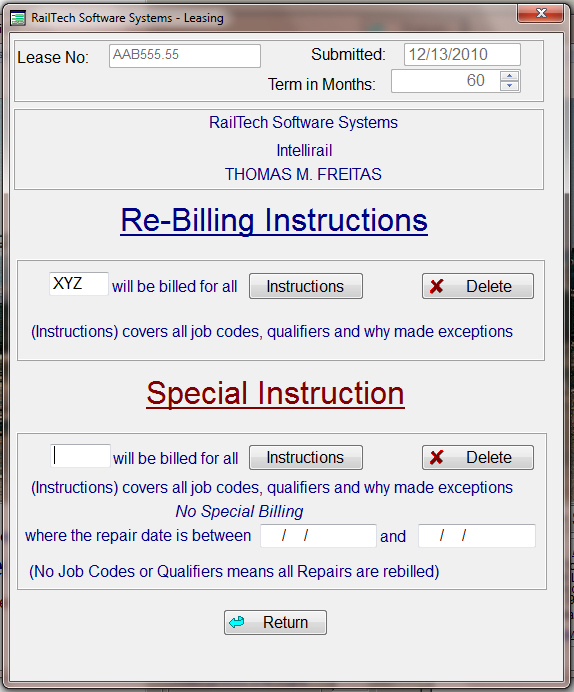
This screen allows two ways of enter re-billing instructions. The bottom "Special Instructions", could be for cars that are coming off of a lease and the agreement states that they are responsible for some items between specific dates where the why made codes are equal to various why made code. It should be noted that the "Special Instructions" supersede all other instructions.
The main re-billing instructions at the top of the re-billing screen first ask for the initials of the company that is responsible for the repairs. This can be the lessee or the lessor. Once you have entered the initials, then click the push button "Instructions" and a screen similar to the one below appears.
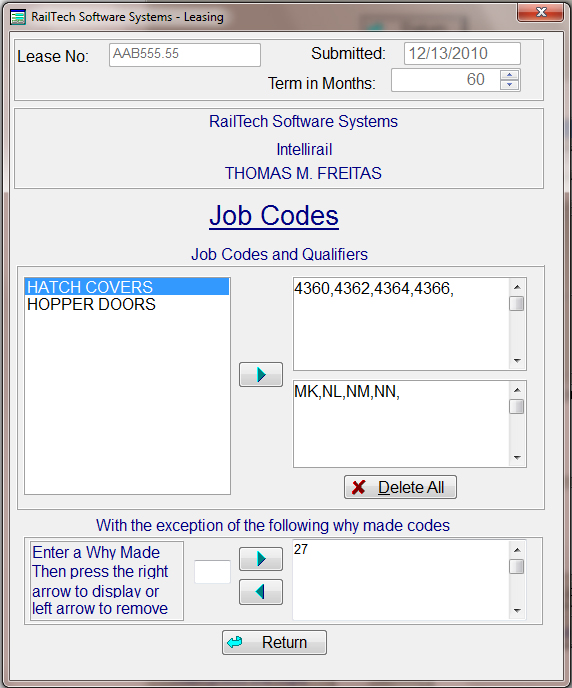
You can either enter specific job codes and/or qualifiers or you can select from defined repairs. If you would like to define repair items such as what is shown above for Hatch Covers and Hopper Doors, this can be done from the main menu by selecting Files, Leases, Define Repairs.
The below screen appears for defining what repair items are.
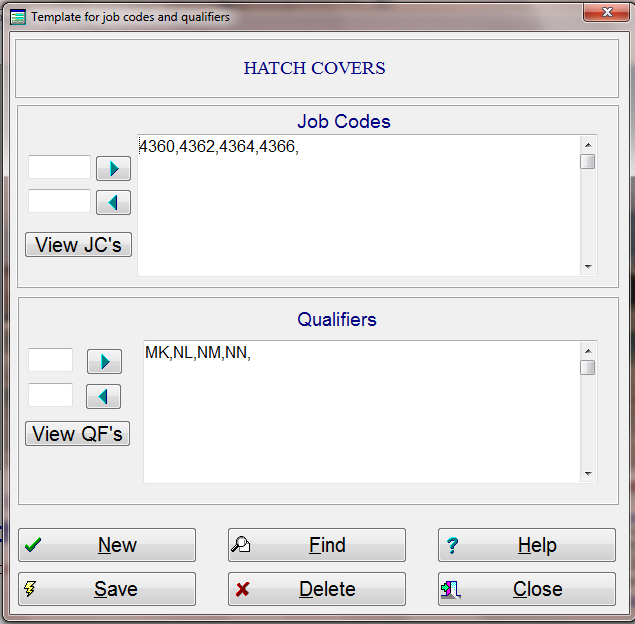
On the left top side you enter a job code and press the arrow push button that point to the right. This will validate the job code and place it in the list. If you want to remove a specific job code, then enter that job code in the entry field below the added job code and press the arrow that points away from the list.
Do exactly the same thing for qualifiers if you need to. If you are not sure of what job code or qualifier you want to use, there is a lookup in the View JC's or View QF,s.
Once you have the job codes and/or qualifiers defined for a specific repair name, you can then use that repair name in the lease file for re-billing by selecting the defined repair and pressing the arrow push button. This will automatically list the job codes and/or qualifiers in the appropriate areas.
Now that the re-billing instructions in our example shows that the company is responsible for all hatch and gates, we need to let it know that there is an exception if the why made code is equal to 27, corrosive. The re-billing instructions allows you to have no why made codes or as many as is required by the lease. Simply enter a why made code in the entry field then press the push button and it is added to the list. Once you have finished with entering all the re-billing instructions, press the "RETURN" push button and you will be back on the first page of the lease file.
Payment:
The next item is for payment on the lease. Is payment on a daily basis, weekly, monthly, quarterly, semi-annually or annually. Is this payment in the Arrears or in Advance.
Options:
The options allow you to choose Purchase, Renewal, Others and Disposition. The Purchase Option and the Renewal Options have an effective date with either a future market value selection or a specific value selection. Others includes things like remarking responsibility, when remarking is to be done, Tax Responsibility, an Option to Cancel the lease, Free Storage Days after lease expires and Excessive Mileage charges after a specific mileage. The Disposition push button is for where a car is to be shopped to if the lease designates this.
Rent Abatement:
The equipment can be assigned rent abatement by selecting Yes. If you select Yes for rent abatement, than you must select when it starts. Rent Abatement may start when you are notified that a car is bad ordered or when a bad ordered car arrives at a designated shop. You can also state that the start date is a specific number of days after one of the above selections. Then you need to enter when the Rent Abatement stops, when it is returned or a number of days after it is returned.
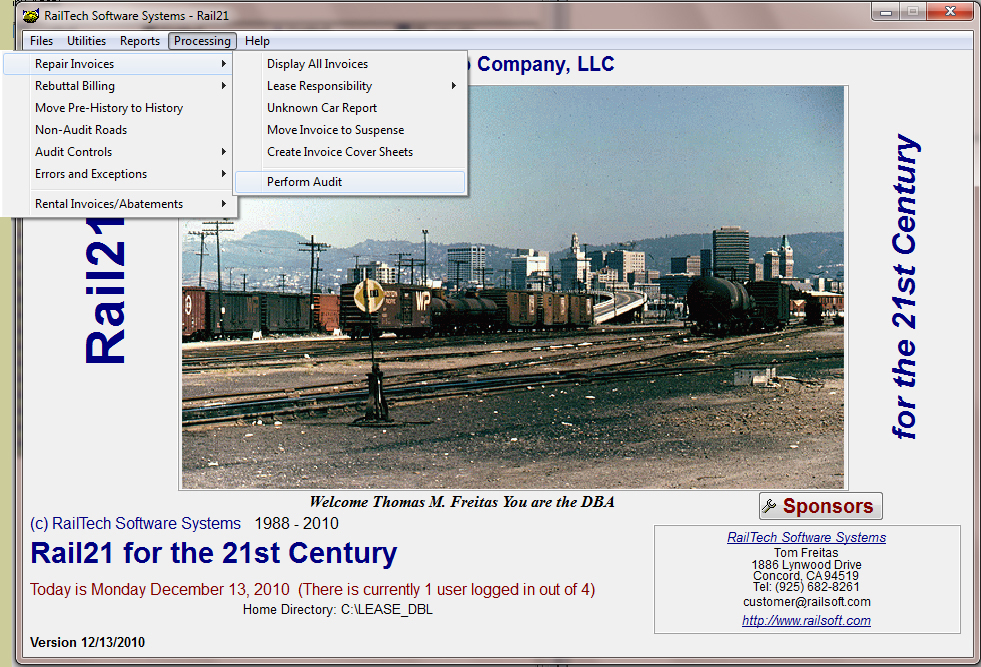
From the main screen, select "Processing", "Rental Invoices/Abatement", "Create Invoices/Abatement" and the below screen appears.
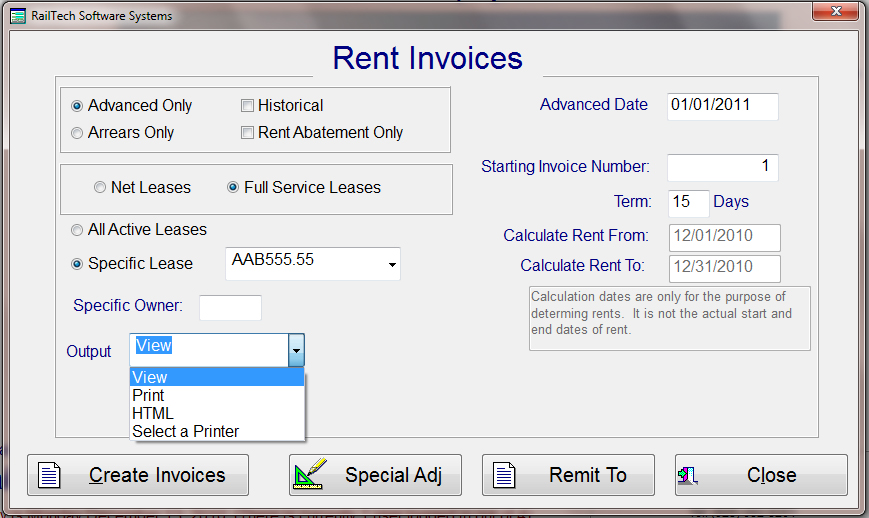
The rental invoicing is primarily for Lessor's, but can also be used by Lessee's for validation purposes. When you create a rental invoice or invoices, the system will always calculate rent payments based on the dates that you want as indicated below. The system will also look at the cars in shop, if any, and will calculate "Rent Abatement", if the lease indicates rent abatement. It will also calculate according to the lease instructions.
The initial screen is for setting up the permaters of creating rent invoices. The system is designed to bill for any given month and year. If the lease payments, also know as rent, if paid on anything other then a monthly rate, it is calculated out to show what the rate would be for the month. It is further calculated out to show what the daily rate is based on the number of days in the selected month.
You must first decide what kind of lease you want the invoice to be stated on, Advance or Arrears. If you choose Advance, you have the option of creating historical advance invoices. You must also decide if the invoice is to be on "Net Leases" or "Full Services Leases".
You can select all leases or a single lease. Next is the Advance or Arrears date that you want all calculations to be based on. What ever date you enter the appropriate dates will appear in the calculated date fields below. Then enter what you want the invoice number to start with. Each invoice number after the first will have then next number in the sequence. The term can be anything from 0 to 99.
Once this information is created, it will always appear whenever you go into this screen. If you change any settings, then those settings will become the default settings.
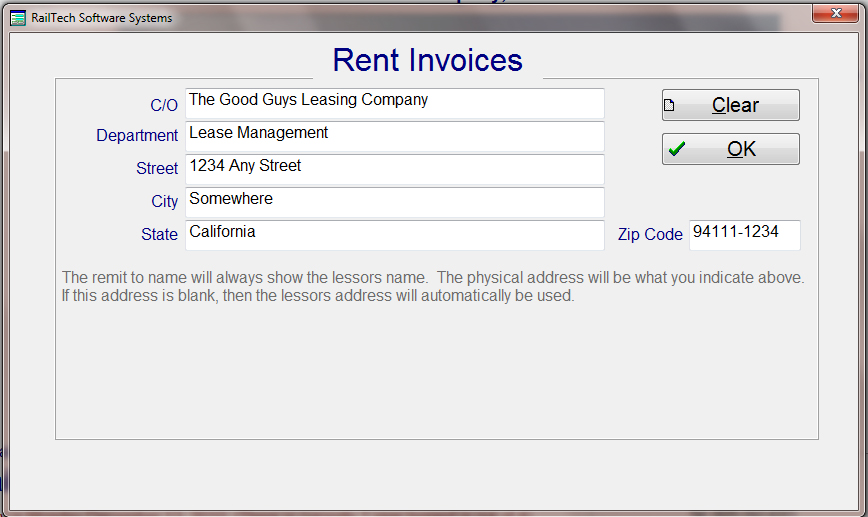
You will notice that at the bottom there are four push buttons. The system by default will show the Lessor's name and address on the invoice for the Remit To. If you have multiple lessor's and/or want the payments to go to a specific address, then you can enter the physcial address by pressing the "Remit To" push button.
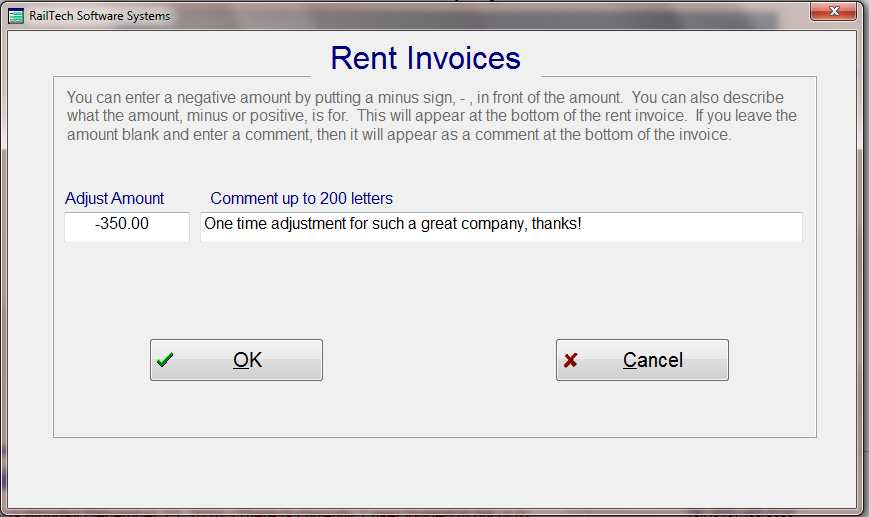
If you are invoicing a "Specific Lease Number", then you will have the option of selecting the push button "Special Adj". This screen has two functions;
1. you can adjust the total amount of a lease up or down by entering either a negative amount or a possitive amount. If you enter an amount, then you must also enter a description of what the amount represents.
2. You can enter a comment by not entering an amount but entering something in the comment field.
The comment or description can be up to 200 characters in length. If you are adjusting the rent invoice, then the comment and amount will appear just prior to the total amount owed. The total amount owed will be adjusted to reflect the adjustment.
If there is no amount, but you have entered a comment, then the comment will appear after the total amount owed with the word "Comment: " prior to the statement.
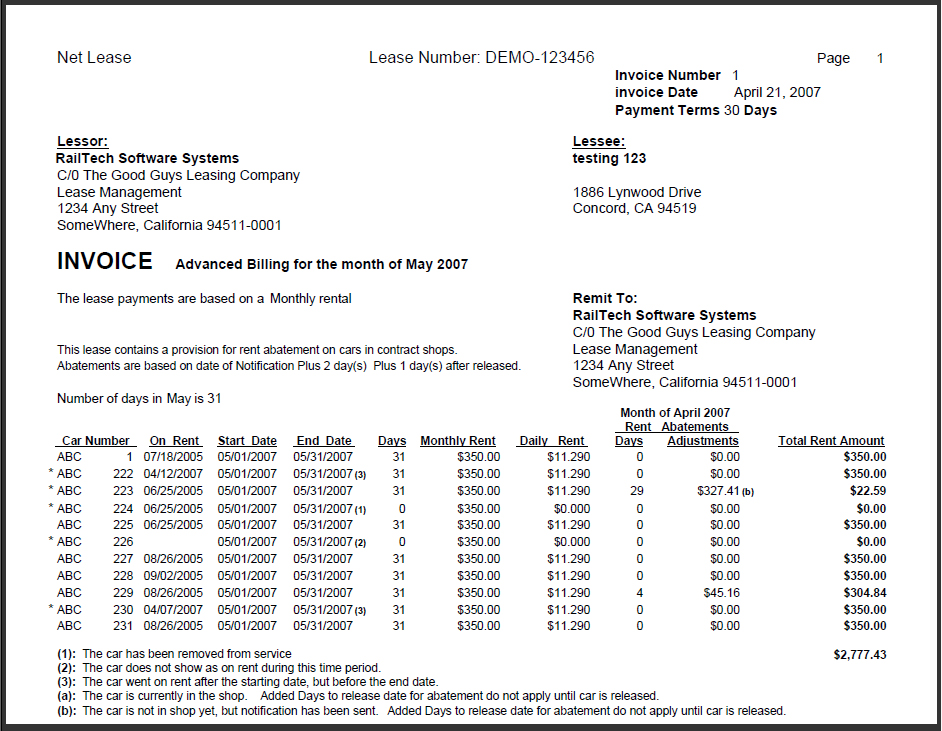
Below is an example of a rent invoice output