Whenever you receive an invoice and that invoice does not come with a Data Exchange file, then you must enter the information manually. From the main menu, select Files, Invoice, Create and a header screen will appear. This is where you enter all the invoice header information. The system will verify that there is a record in the rolodex file for this company as well as for the company that is being billed.
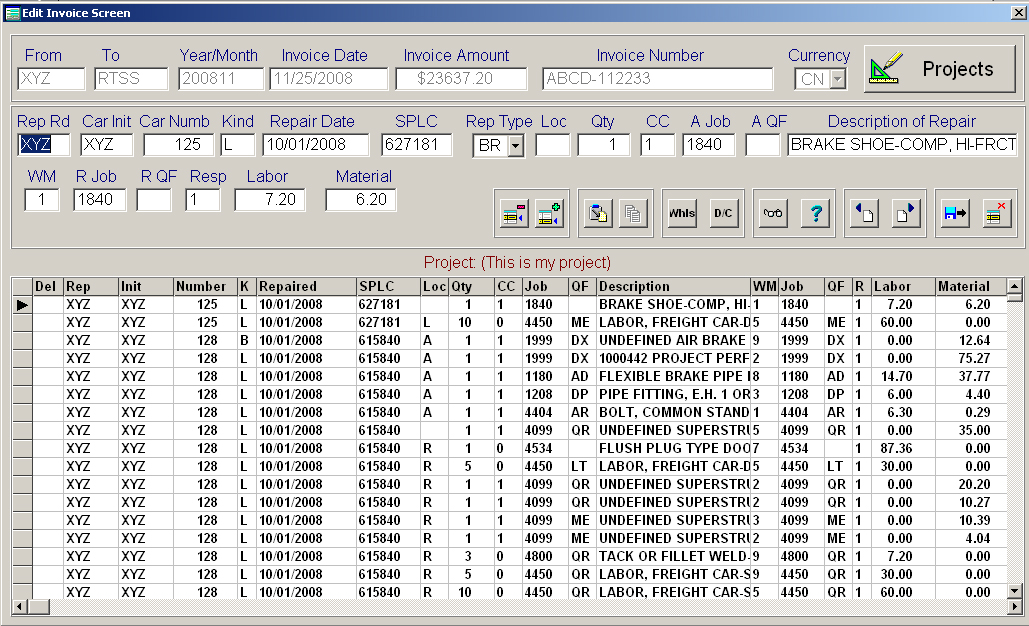
Once you have entered the header information, then press the push button marked Details and the below screen will appear.
The Detail listing can not be changed or edited from the detail area. You can change any information in the detail by clicking on the line you want to change. When you click on a line, then all the information for that line will appear in the entry fields below the header information.
When you enter an applied job code, then it will automatically copy that code to the removed job code, which can be manually changed. Likewise, when you enter an applied qualifier, then it is automatically copied to the removed qualifier, which can be manually changed.
When you enter an applied qualifier, the system will then look for the job code and the qualifier description. If the system finds the job code in either the AAR Job Code file, the NitLeague or your User Job Code file, then that description will automatically appear in the description entry field. If you enter a Rule 83 Qualifier, then the qualifier description will appear after the job code description. You can also over write the description if you choose.
If the job code you enter is a Wheel Job Code, then the wheel screen will automatically appear where you can enter the wheel information. If the wheel information is already in the field, then the wheel screen will not appear. However, you can always click on the Wheel push button, if you need to edit the information that is there.
If the invoice is for a project, then the project name will appear just above the detail listing of repairs. If you want to assign a project to the invoice, then press the project push button to select which project you want to assign.
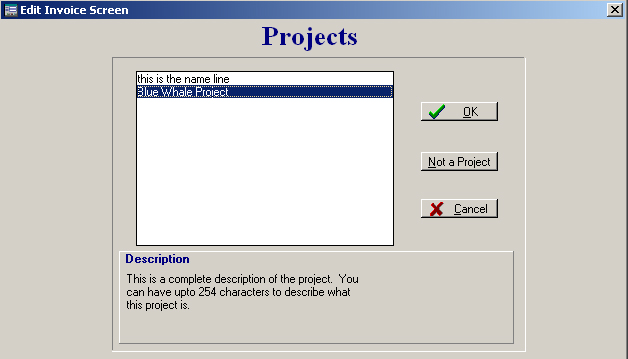
The Project screen will display all the projects with a short description of the project in the top box. If you highlight the short description, then the detailed description, if any, will appear in the bottom area of the screen. If the invoice is assigned to a project in error then press the Not a Project push button and it will be removed from the invoice.
If you need to edit an invoice, the exact function above apply. The first screen you will see when editing an invoice is the screen that prompts you for the invoice that you want to edit, see below:
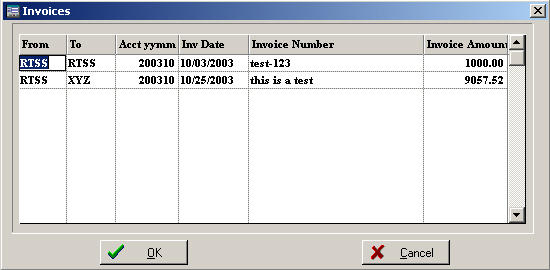
Simply highlight the invoice you want to edit and press the OK push button. The screen at the top of the page will then appear.