This program comes with a Handheld Import Utility. Once you have the handheld data in a text format with no delimiters, you can transfer it to your PC and then upload the file into our Handheld Utility. This program is designed so that the repairs can be entered as easy as possible. The system will evaluate each line and make the line as, if responsibility code is not 3, then Billing Repair Card, if responsibility code is 3, then defect card. The system will also assume that all repairs were performed on a Rip Track, if you are a railroad, or in a Contract Shop, if you are a shop. Each Car is considered to be Empty at the time of repairs. If any of those default items are not correct, then you can change them through the Utility program on the main menu.
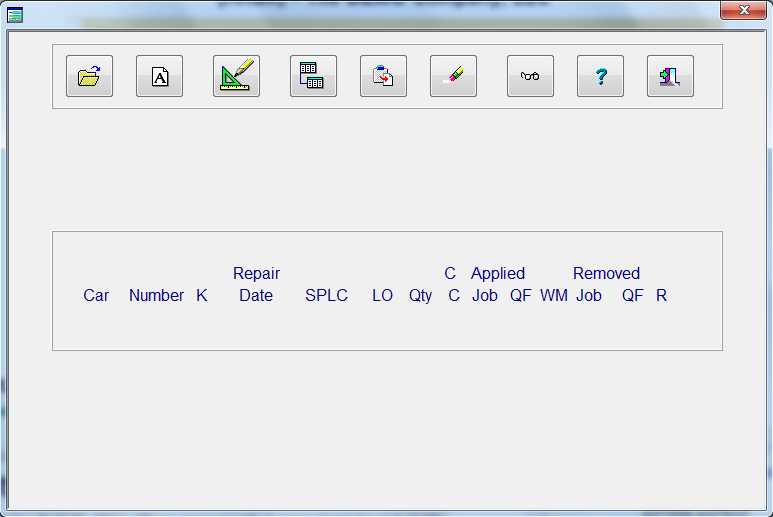
Each push button above is in the order that you will perform your task.
1. upload the data
2. Audit the data
3. Correct any errors
4. Transfer the data.
The other push buttons to the right are Delete all records in the handheld file, View the records, Information about the program, Help and Exit.
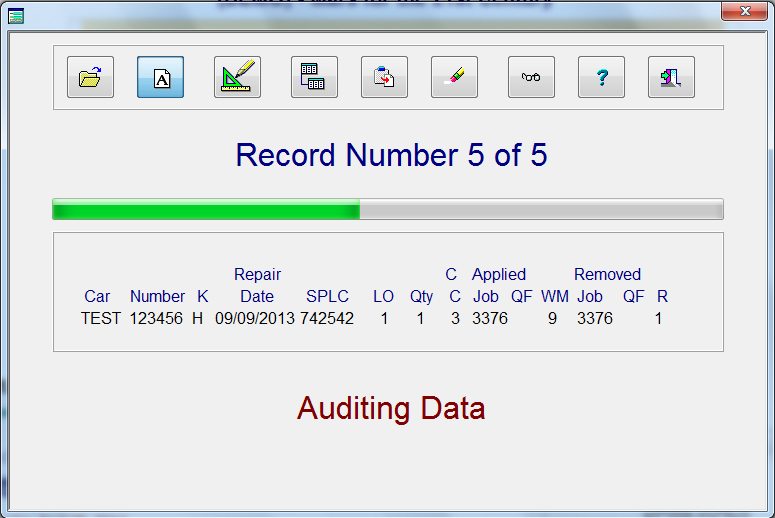
When auditing the imported repairs, each line will appear as it is being audited. You will also see what record number is being audited and how many records there are to be audited. When auditing is completed, a screen will appear informing you how many errors there are that need to be corrected. The system is designed so that you can not transfer any records to the appropriate file until all errors have been corrected or the error lines are deleted.
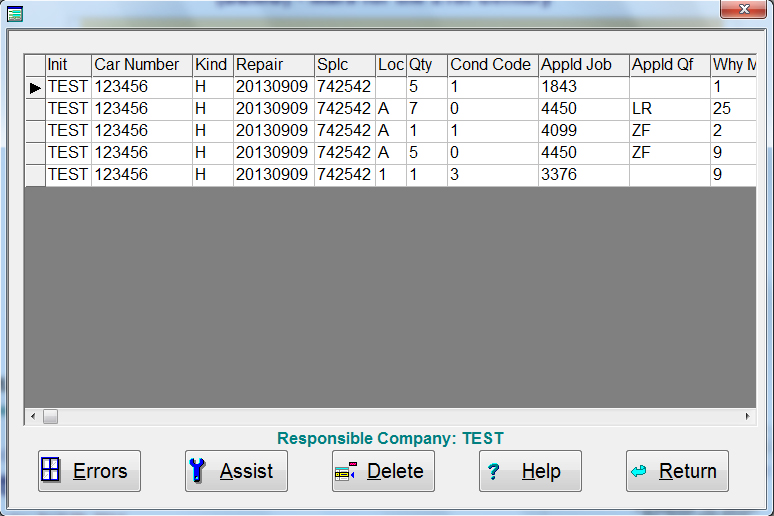
When and error is present, you can view all records with errors by selecting the push button, (Hammer and Screw Driver), from the main screen for fixing errors. In the error screen, if you press the View Errors push button a screen will appear informing you of all the errors that have been found on the line of repair. You can change the data directly from the screen or click the push button assist to change multiple lines or items of repair. Once all errors have been corrected or deleted, you must perform the audit again. After performing an audit and no errors are detected, you may then transfer the repairs to the appropriate file.
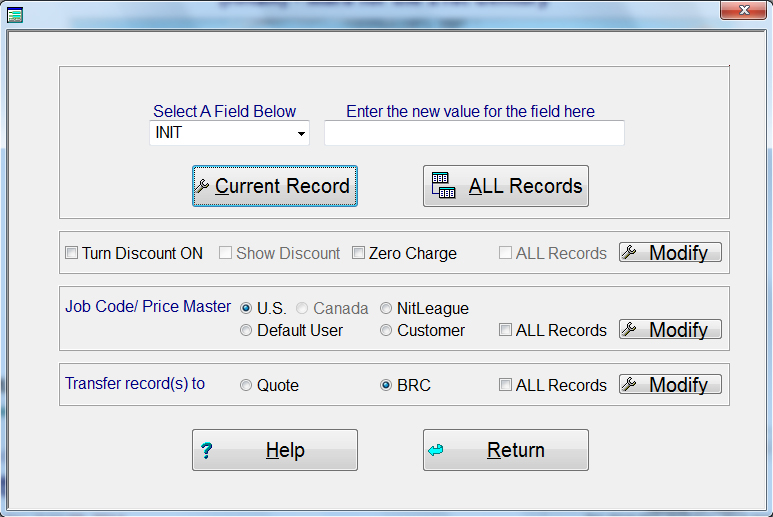
The assist screen will automatically change all records or the current line that you are on. Simply select what you want and press the push button for that selection. When the modification is completed, the system will let you know.
The first selection is a pull-down for each field in the database. Select the field that you want to modify than enter the value in the entry field on the right. Press either "Current Record" or "ALL Records" and the modification is completed.
You can also turn all discounts on or off, The discount will only show ON or OFF based on the current record and not all records. You can also select Zero Charge which will remove all charges for the repair. If you check the box "ALL Records", than the modification will apply to all repair lines.
The next selection if the ability to change all the Job Code and, if present, Price Master based on the selection you choose.
The last selection is where the record will be transferred to based on the data that was imported.
If you change all records, the system will automatically change the audits that have passed to open again for validation of the changes. Once you are finished with your modifications, you must perform an Audit. This will validate all entries and will inform you of any errors that the system found. Remember, you can not transfer the data until all data has passed the audit!
Field  	Field Name	Type		Length
1	INIT		CHARACTER	   4
2	CAR_NUMBER	CHARACTER	   6
3	KIND		CHARACTER	   1
4	REPAIR 		CHARACTER	   8
5	SPLC		CHARACTER	   6
6	LOC		CHARACTER	   2
7	QTY		CHARACTER	   4
8	COND_CODE	CHARACTER	   1
9	APPLD_JOB	CHARACTER	   4
10	APPLD_QF	CHARACTER	   2
11	WHY_MADE	CHARACTER	   2
12	REMVD_JOB	CHARACTER	   4
13	REMVD_QF	CHARACTER	   2
14	RESP		CHARACTER	   1
15	DC_INIT		CHARACTER	   4
16	DCDATE		CHARACTER	   8
17	WHEEL_READ	CHARACTER	  22 *** Wheel Information bELOW ***
18	P_MASTER	CHARACTER	   1 Always leave blank
19	DISC_TYPE	CHARACTER	   1 Always leave blank
20	QUOTE		CHARACTER	   1 *** See Quote Information Below ***
21	DESCRIPT	CHARACTER	  50
22	MATL		CHARACTER	   7 *** Show as 9999.99, Also see zero material belos ***
23	LABOR		CHARACTER	   8 *** Show as 9999.99
24	ROAD		CHARACTER	   4
25	TIME_ONOFF	CHARACTER	   1 *** See Time Standards Below ***
26	ZERO_MTL	CHARACTER	   1 *** See Zero Material Below ***
27	DISCOUNT	CHARACTER	  16 *** See Discount Information Below ***
28	ENTITY		CHARACTER	   4
Quote Information
X will allow this record when transferred to go to the Quote file, Blank is BRC file.
Time Standards
Placing an X here will turn off the checking of the time standard for this job code.
Discount Information
The DISCOUNT field is 16 characters in length and each position has a specific meaning.
Position 1-7 = PO Number
Position 8 = "X" for Group billing or Blank for Detail billing
Position 9 = (E)stimate, (S)upplemental or Blank
Position 10= Price Master; A=AAR, C=Canadian, U=Customer User, N=NitLeague, D=Default User
Position 11= "X" for Zero Charge
Position 12= "X" Discount ON, Blank is Discount OFF
Position 13= "X" Show Discount, Blank Discount but do not show on BRC only Invoice
Position 14-16= Not currently used so leave Blank
Wheel Information
The wheel information must be in the following order
Any item that shows as 2 digits must have a leasing zero if the number is less then 10
Applied Month  2 digits
Applied Year   2 digits
Applied Manuf  2 characters
Applied Class  1 character
Applied Side   2 digits
Applied Finger 2 digits

Removed Side   2 digits
Removed Finger 2 digits
Removed Month  2 digits
Removed Year   2 digits
Removed Manuf  2 characters
Removed Class  1 character