Entity Information
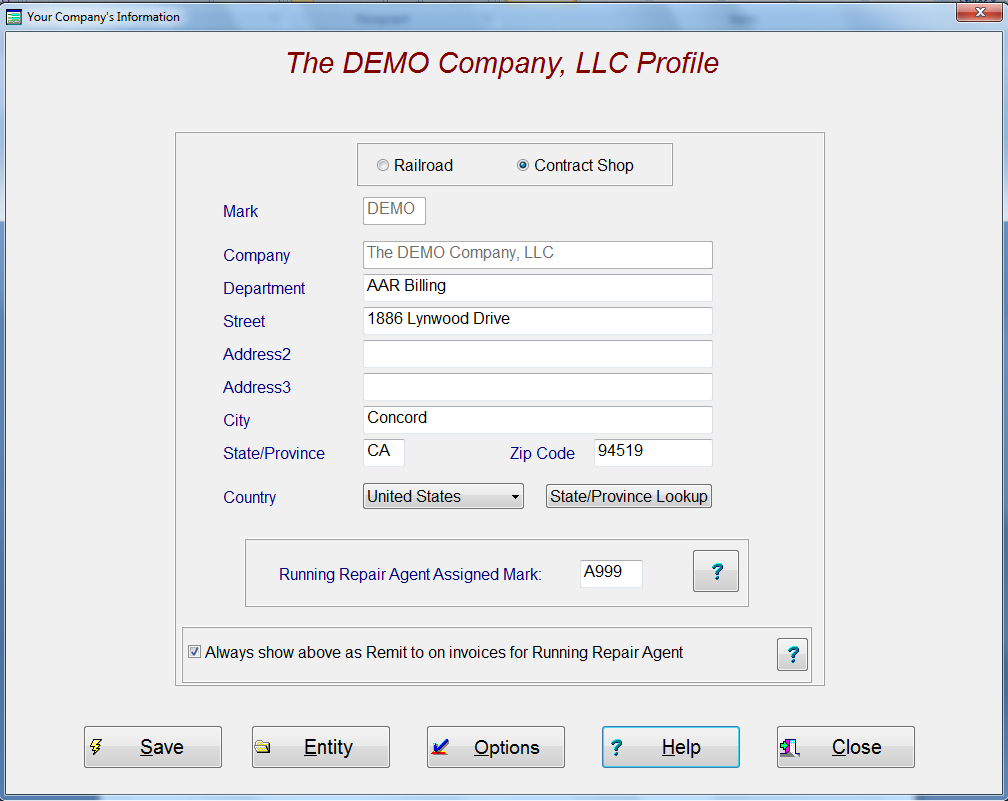
This screen identifies your company for billing purposes as well as data
exchange information. You need to
mark at the top if you are a railroad or a Contract Shop. The company mark at the top can not be
changed as this is hard coded into the systems. The same is true with the company
name. The system will allow you to
write over the company name, however it will not be
saved. You may change any or all
other fields below. If you are a
Canadian company, then the state will show CN for
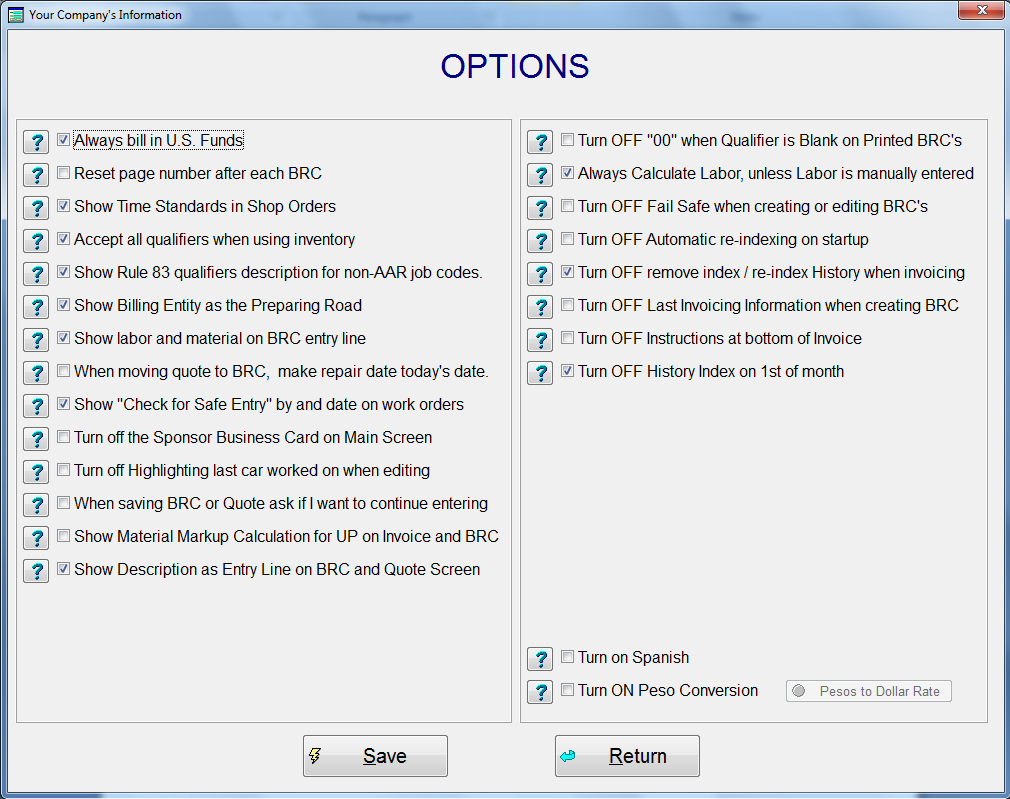
1. If you bill using only the
2. Reset page number and Show time standards or self explanatory.
3. If you check the “Show Time Standard in Shop Order”, will display the AAR Time Standard for the job code multiplied by the quantity.
4. Accept all qualifiers when using inventory will allow you to create inventory records without designating any qualifiers. Example: A Rule 72 job code could have over 100 different alpha qualifiers assigned to it. If you check this box, then you only need to enter a one line entry in inventory. This will allow you to create added parts in inventory so when creating a billing repair card, the system will ask you which part you want to use.
5. Showing Rule 83 qualifier descriptions for non-AAR job codes allows the system to add the qualifier description after the first 20 characters of the job code when using any job code file.
6. Show Billing Entity as the Preparing Road.
7. Show Labor and Material on BRC entry line. This feature will automatically show the Labor entry field and the Material entry field after the removed why made code and before the responsibility code on the entry line. If you enter nothing in these fields and “N/C” is set to OFF, then they system will price according to your instructions in the customer profile. If you enter an amount in either the Labor or Material fields, then that is the only price will be entered! The exception would be if the “Always Calculate Labor, unless Labor is manually entered”, is checked.
8. When moving Quote to BRC, make repair date today’s date. This selection will automatically change the repair date to the current date whenever you move a quote file or files to the BRC file. The BRC file is the Pre-Billing file where are invoices are created from.
9. Show “Check for Safe Entry” by and date on work orders will display the lines for a person to sign on a work order if this is checked.
10. Turn off the Sponsor Business Card on Main Screen – For company’s that do not want the sponsor business card displayed
11. Turn off Highlighting last car worked on, when editing. The last car worked on in a specific file for the specific user will always display on the list of cars when editing. The last car worked on, if still present, will always be highlighted for fast editing if this check box is not checked. If it is checked, then the list box will always start with the top car.
12. When saving BRC or Quote ask if I want to continue entering. This is used for those that are entering a lot of lines for a single car and want to make sure that the data is saved while still entering the data. This is a failsafe in case the power where to go out or something of that nature.
13. If you are billing Union Pacific Railroad through their CAS system or billing them through the TTX SEI system you can have the material percentage mark up entered in the customer profile calculate out on the BRC and Invoice by checking the box “Show Material Markup Calculation for UP on Invoice and BRC”.
14. Show Description on Entry Line allows you to overwrite the description while entering a line of repair or simply leaving it as it is.
15. Turn OFF “00” when Qualifier is Blank on Printed BRC’s
16. Always Calculate Labor, unless Labor is manually entered. This means that you can overwrite an
The “Entity” push button brings up the below information pertaining to invoices.
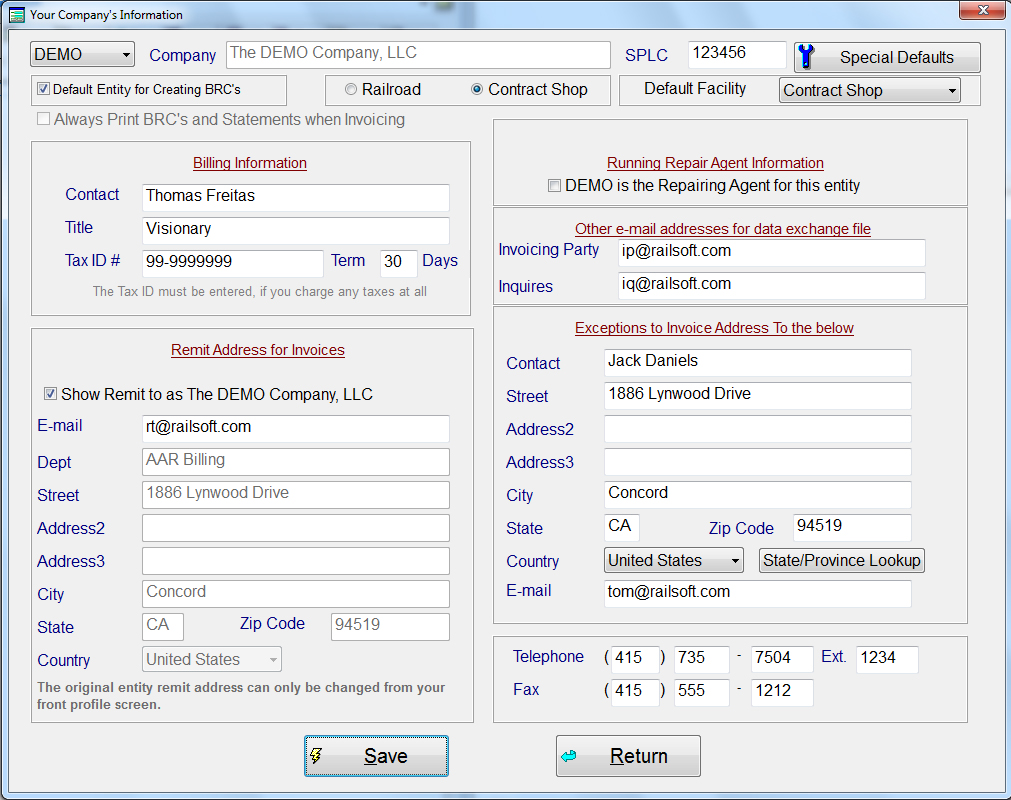
The entity information screen has four sections to it. If you have more then one entity that you create bills for, you can state which one you want to appear as the default entity. This means that when you create a BRC or Quote, this is the entity and the SPLC that will appear in the entry screen. Of course, you can change it to any entity you want, this just makes it for easy entry.
The first section is the Billing Information, which is required for data exchange files. The only fields that do not have to be entered are the Title, Ext if none exist, and the Tax ID if you do not bill TTX or UP. This information becomes a summary file at the end of each invoice in the data exchange file along with the information on the main page of the Entity screen. If you have more than one entity, then you must select each entity from the pull-down on the top left and enter the information for each. Make sure that you designate the entity as either a Contract Shop or a Railroad.
The second section is the Remit to address that appears on the cover of your invoices. If you are using only one entity, then these fields are inactive and you must use the first screen of your Company Profile to enter this information. If you have multiple entities, then you must change the remit to address to reflect each entity. As you select an entity from the pull down on the top left, all the information will change to reflect the entity selected. Before you move from entity to entity, you MUST press the “Save” push button or the information will not be saved. If the Remit Address Company Name should be the same as the main entity, the check the box “Show Remit to as <Company Name Here>”
The third section applies only if you are a Running Repair Agent. If you are a Running Repair Agent for this company, then you must check this box indicating that you are. This will force your Running Repair Agent Code to appear as the Bill From Initial in the data exchange files.
The fourth section is information pertaining to Exception letters that appear on the invoice cover sheet. This information is not required, but is highly recommended.