Billing Repair Card / Quote Estimate
The
billing repair card, Quote Estimate and Group Billing is designed for easy
entry as well as stability in entering data. Before you can enter a billing repair
car or Quote Estimate, you must have a company listed in the Rolodex file that
is designated with the check box as Invoicing. You must also have a customer Profile
set up if you wish to give this specific customer a discount or need to
designate how the company prefers to be invoiced. The employee’s initials and actual
time is only displayed if the check box in the Entity selection states that you
want this action. The customer will
never see this information.
If
you are using the single entity version, as most users do, then that pull-down
will be inactive. If you have
multiple entities, meaning that you represent more then one company, then you
may select from the pull-down.
Next
you will need to select the company responsible for the payment of this
specific billing repair card from the pull-down, marked Company.
Note: You can only use the TAB key or mouse to
move out of a pull-down field.
If
you enter the initial for either the entity or the company, the system will
verify that the initials or registered in the appropriate files. If it is not, then you will be notified
and the system will not allow you to go any further.
The
Once
you select a responsible company the company billing information will appear on
the lower right of the screen just under the browse area. This will always display the current
The
system is designed so that you can select different responsible companies for
each line of repair or keep all lines as the responsibility for just one
company.
The
next several entries are the normal header information that you or your
customer will see on the billing repair card.
The
only validation that are done at this level are that the car initial is at
least 2 alpha characters in length, the car number is 1 or greater, the splc is 1 or greater, the repair date is not a future
date. If the repair date is greater
than 90 days old, the system will ask you to verify that this is correct. They system will also validate that if
you have a defect card initial, that it is greater than Alpha 1 character in
length and that there is a defect card date that is less then the current date. If the defect card date is greater then
four years, the system will ask you to verify the date. Rule 107 states that you must repair a
car within four years of the defect card date. Rule 112 states that a car must be
billed within one year of the repair date.
Once
you have entered all the header information correctly, then
press the Detail push button. Once
you press the detail push button and validations are correct, all fields in the
header group, except Responsible Company, will become inactive. If you are editing a billing repair
card, then this is where you will start!
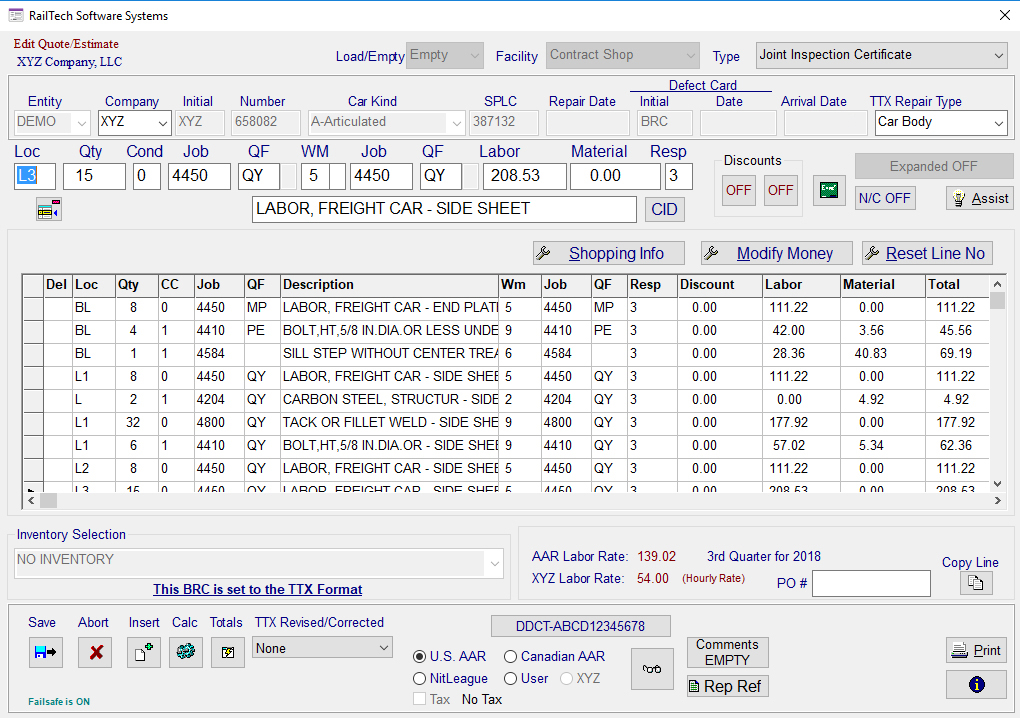
The
entry fields under the header information are where you will be entering the
detail billing.
If
you have selected the OPTIONS in your profile to show Labor and Material on
the entry line, the you can either press enter through the
line and have the system calculate the charges according to that
customers profile, or you can overwrite one or both fields. If you overwrite the material field and
the job code has a price master associated with it, then the system will still
calculate the Labor field according to your customers
profile.
If
you have selected the OPTIONS in your profile to show the Description on the entry line, then after you enter or leave the
applied qualifier field, the system will display the applied job code
description as well as the qualifier description if the qualifier is a Rule 83
qualifier. You can either except
the description or overwrite it.
When
you enter the responsibility and press your Enter key, the system will validate
your entry to make sure that it is 100% accurate.
At
the bottom left side of the billing repair card is a selection to show if the
line of repair is an Estimate or a Supplemental to an estimate. This is for the benefit of you as well as
some other companies that may require this added information in the data
exchange files.
They
system will validate every line of repair so that it conforms with the rules of the job code/price master file that you
have selected. If you are using
either the
When
the system detects an error while using
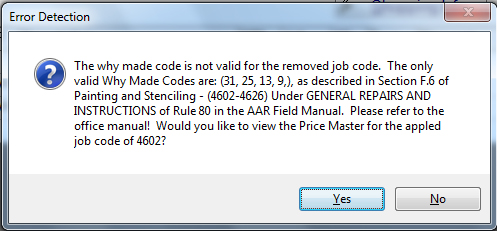
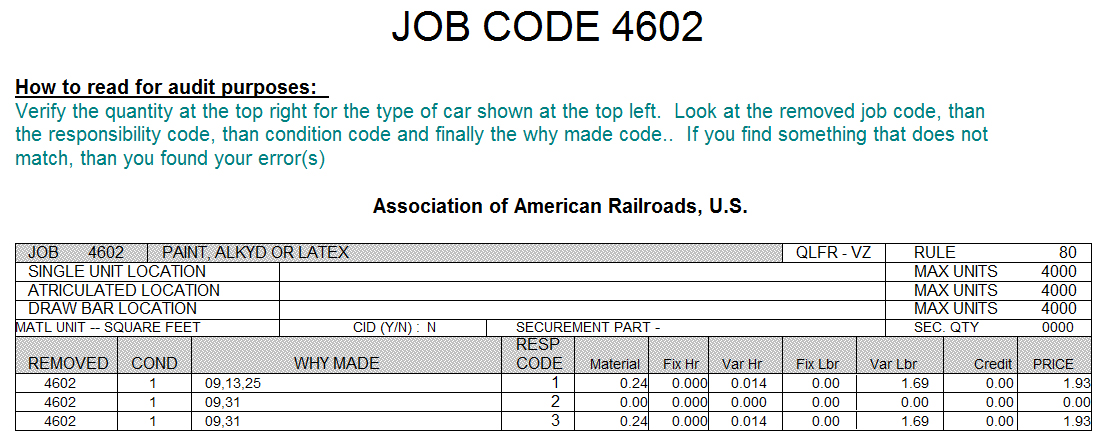
If you click YES to view the price master for the error, then the page of the price master for the specific job code would appear as in the example below.
By
holding the mouse over a push button, a speed tip will appear under that button
informing you what its function is.
The
next two push buttons in the square Discounts are for Discounts to be turned ON
or Discounts to be turned OFF. If
you turn the discounts on, then you must have a customer profile stating what
the hourly rate and/or defect card discount is. If you turn the show discount OFF and
have the discount set to ON, you will still see the discount amount on the
billing repair card, but it will not appear on the printed billing repair
card. When invoicing, the discounts
will always appear on the Invoice cover sheet as well as the Statement summary.
The
green pushbutton with the E=MC2 will reset all amounts on the current line to
$0.00. This allows for
recalculating prices. The system is
designed to calculate the price according the selection from the pull-down at
the bottom left side of the screen.
However, if you want the price to be $0.00 charges, then the push button
showing "N/C OFF" can be pressed to display "N/C ON",
meaning No Charge.
Assist
is a tool to assist you in writing a correct line of repair. It is designed to display pull-downs in
a very logical order. You will
notice that the pull-down starts with the table of contents from the AAR Field
Manual. When you press Next, the pull-down will give you the sub selections from
the table of contents that you selected.
The next page will display all the applied job codes and removed job
codes along with their descriptions for the selection you made. You may select any of the pull-downs to
see the job codes and allowable removed or applied job codes for what you selected. The last page shows how the line will
appear with a few pull-downs that you may want to use. Where the pull-down is N/A, then it will
be inactive. Once you are satisfied
that the line of repair is how you want it, then press the push button
"Write" and the line of repair will appear on the entry fields
waiting for you to validate the line of repair.
The
description will show the applied job code description along with the Rule 83
qualifier description automatically.
If you would like to change the description, simply click on the
description field and write anything up to 40 characters long. The system is designed to never over
write a description, if one is present.
If you change the applied job code to another job code, the system will
remove the description as well as the charges from the line or repair.
If
you want to price something outside the pricing program, then you can go into
the Labor, Material, and/or Discount Fields and change them to whatever you
like. The system will not price if
any of the fields have an amount that is not equal to zero. You may also enter a negative amount.
If
you select a Job Code / Price Master file of NitLeague
or User and the inventory is set to “NO INVENTORY” or you select a
Customer Specific Job Code file with No Customer Price Master and inventory is
set to “NO INVENTORY”, two fields will appear in the entry line;
Labor and Material. This will allow
for continuous entry of a line if you would rather not enter the amounts as
described in the previous paragraph.
The
system will not allow you to enter a responsibility code of 3 unless you have a
defect card initial and defect card date in the header. If you do not and you need to enter this
information, then go to "Utilities" and "Global Changes"
from the main menu.
If
you are using inventory, the pricing of inventory on each line can be any way
you would like it to be by selection from the pull-down at the bottom left side
of the screen.
In
order to save a billing repair card, press the push button with a picture of a
floppy disk on it and an arrow pointing to the right. This button is located at the bottom
left side of the screen.
Next
to the save push button is the Abort or Exit without saving push button. If you press this push button, you will
be asked if this is correct.
The
next push button is for inserting a line of repair under the current line of
repair. If you want a billing
repair card to print in the natural order, the way it is enter, this can be a
very useful tool.
We
also have a calculator push button which will display a calculator for you to
use. The next push button is for
displaying the total of the current repairs. This pushbutton will give you the total
amount of Labor, Material, Discount and Grand Total.
The
price master, if available, is determined by the job code file you select. If the last price master is inactive,
that is because you do not have a job code file for that specific company. The system will only price a customer
specific job code if you have created a price master for that company. If there is not price master, such as
Default User, NitLeague, and customer with no price master, then all prices must be manually entered.
The
eye glasses push button are for viewing the job code files as well as the Rule
83 Qualifiers. The last push button
is for shopping information. If you
have entered a car in the shopping file and you press this push button, the
system will display the information of who called, when notified and for what
reason.
If
you click on any line in the browse screen, the information will automatically
appear in the entry fields at the top.
This allows you to change information at any time. To move up or down the file, simply move
the scroll bar on the right of the browse area. The only fields that you will be able to
change in the browse area, are the description, Labor, Material, and
Discount. If you want to delete a
line, check the box at the left side of that line. A red mark will appear and the line will
be deleted when you save the billing repair card. If you want to undelete a line that you
have flagged for deletion, then check the box again and the red mark will
disappear.