
Shopping information is created directly from the quote or billing repair card entry screen. Above the billing detail and under the CID push button is the push button for "Shopping Info".
This push button appears only if the entity that is creating the repairs is a contract shop.
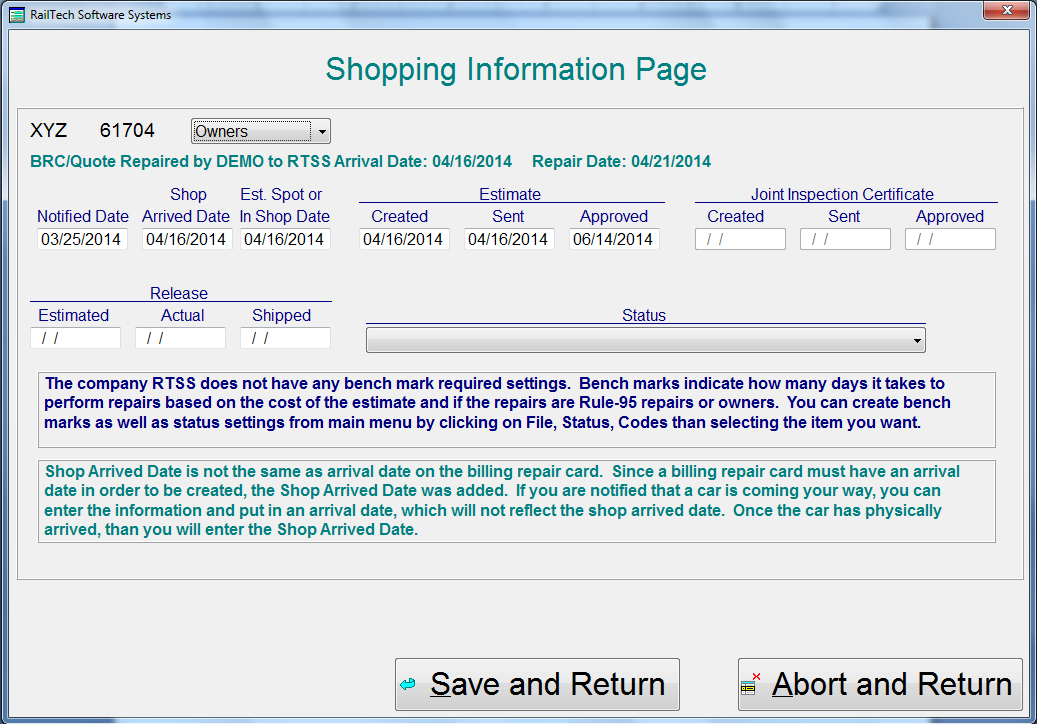
At any time during the entry process or if you simply want to view the status of the equipment, simply press the push button "Shopping Info" and the below screen will appear.
The procedures of entering car status information is the following;
1. You should create a User Job Code with a description that represents the notification of a car coming to shop. Example: Job Code 0001 with the Description of "Notification for Shopping"
2. If a car arrives without notification, than you do not need to enter the notification job code as it is simply used for getting the car in the system.
3. As in all quotes, the quote should be put into the quote file.
4. Once you have created at least one line of information, you can than press the "Shopping Info" push button.
5. When the Shop information screen appears, first select the Repair Type (Owners, Rule-95, Program, Pool), then simply enter the date of each stage that applies to this car.
6. Press "Save and Return" and your done.
7. When you edit a car and/or a new stage to the repairs applies, press the "Shopping Info" push button and enter or change any of the dates.
There are two special instruction selections that you may use, but it is not required. Those two items are "Shop Status Codes" and "Benchmarks". Both these items are given to you by the company that you are performing quotes or repairs for. This items can be entered from the main menu by selecting "Files", "Shop Status", "Codes" and than selecting the item that you want to add or modify.
1. Shop Status Codes: These are number codes of 1 through 999 with a description of what that code means. Example: 1 - "In Pricing", 2 - "Waiting for Material" and so on. You can enter as many items that are required.
2. Benchmarks: A benchmark is a determination on how long it takes to perform repairs based on the cost of the repairs and if it is a Rule-95 repair are not. An Example is 10.00 through 1,000.00 no longer than 1 day, 1,001.00 through 3,500.00 no longer than 2 days, Defect Card between 2,500.00 and 5,000.00 no longer than 3 days. Remember to make this apply to as many areas of cost that you can. If the total amount of the estimate can not be found or there is no Benchmark file for the company, than the display will inform you that there is no benchmark.

Modify Shopping Information
If you need to modify the shop information and the car has already been sent to history, click on Files, Status, Modify Shopping Info and a screen similar to the one above appears. Simply type in the Road, Car Initial, Car Number and repair date than press the Retrieve push button and if the car is found, all data will appear on the screen. Change whatever you need to change and press the Save push button.
REPORTS
All reports for the car status data are in the report screen. From the main menu, select "Reports", "Reports" than select "Shop Status" at the top left side of the screen and the report selection for shop status will appear at the bottom left side.
The reports are all automatic on what files they use.
1. Shop Status report, will give you a one page report on all cars that you have entered "Shopping Info" in. All the data will come from the combination of the BRC, Quote and Suspense files. If you do not have shop information assigned to a car or cars, than they will not be accounted for in any of the Shop Status Reports.
2. Shop Detail report will automatically pull data from the BRC, Quote and Suspense files as well as from the History file within the last 30 days. This report will show all the stages of progress by entity and within entity by road and by Repair Type. A detail line of information will appear for each car including the cars repaired within the last 30 days. The cars repaired within the last 30 days will also show the turnaround times for both shop arrival as well as when repairs were approved.
3. Shop History Detail, is the same as above except that the data is retrieved from the History file only and is based on a specific year that you select from the right side of the report screen.
4. Shop History Summary, is a total of all activity by responsible company from the History file only. When you select this report, you must select the year that you want it based on from the selection at the bottom right side of the report screen.
As in all of our reports, you have the ability to filter the reports to retreive whatever data it is that you want. When you filter a report, you should leave what is already in the filter and press the "Append" push button to add to that filter.