Rolodex / Customer Profile
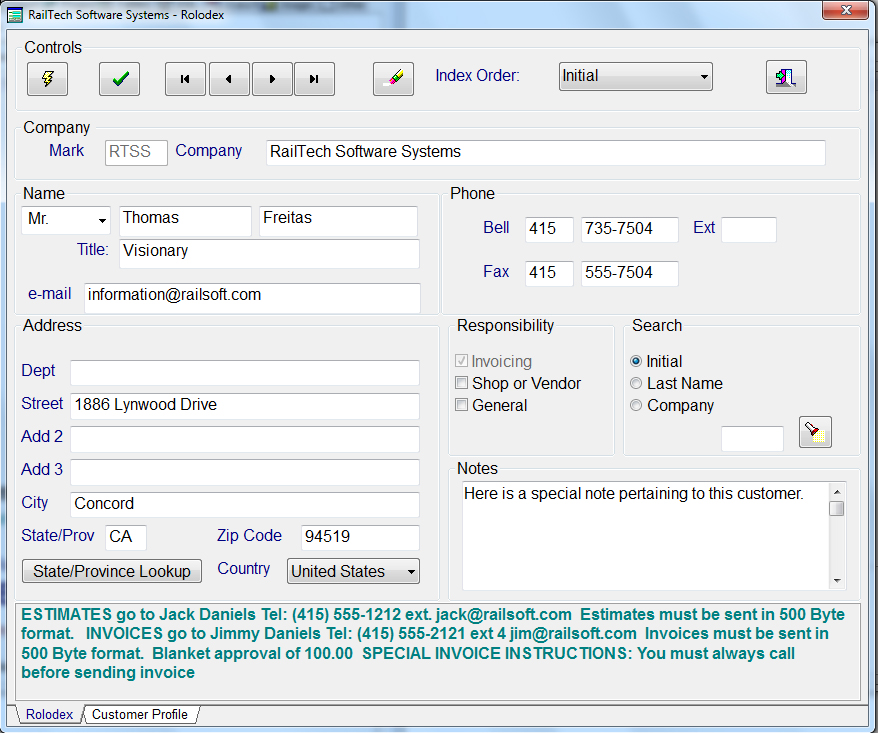
The first screen that you will need to use is the “Rolodex/Customer Profile” screen. The information that you enter here will govern who you can create billing repair cards for as well as quote/estimates and group billing. Whenever you select the Invoicing check box, the system will validate that the initial you entered for this company is unique. The AAR Rules state that you can only bill on person at one company. This does not mean that you can not bill multiple people at one company; it only means that the initials you entered can only go to one person at one company.
Once you are finished enter all the information, you must save it prior to selecting the tab below marked Customer Profile. If you do not save it and there is not a Customer Profile for this customer, the system will inform you that you must save it first. If there is a Customer Profile, the system will simply display the information below once you select the tab at the bottom.
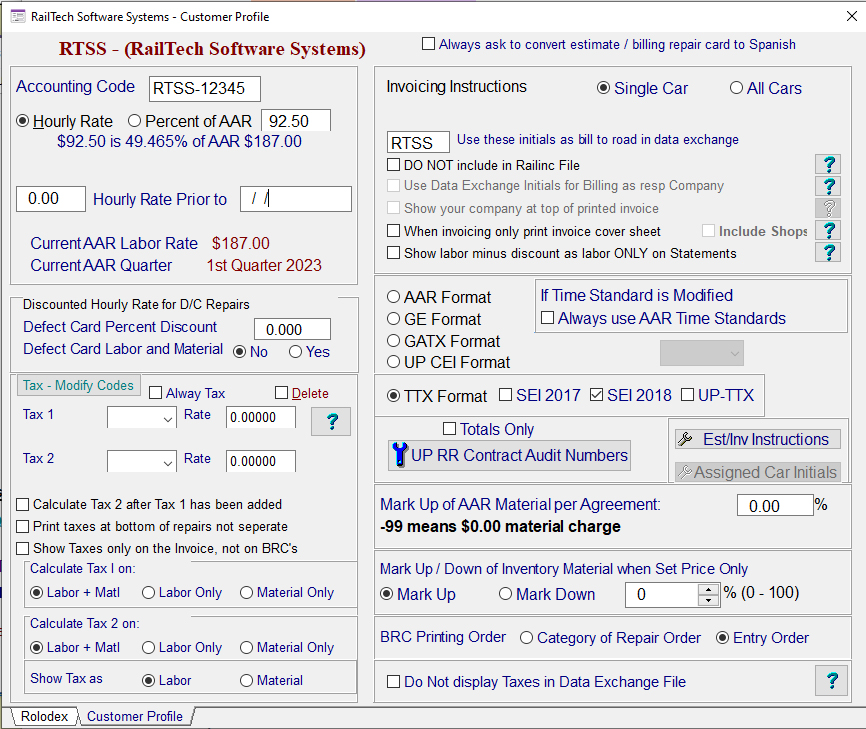
The Customer Profile informs the system exactly how you want to treat each company as you bill that company. The first entry is the Accounting Code, which can be an internal code that you might have for this company. The Accounting Code has no effect on the program and does not need to be entered, if you so desire.
The next item is extremely important if you plan on
discounting repairs for a specific customer. Select Hourly Rate or Percentage
of AAR and enter the amount or pecentage. Below, you will see the amount
that you will be charging this customer for repairs.
If you select hourly rate, the information below will display the
hourly rate you entered and what percentage it is from the AAR Labor Rate of
job code 4450 of the current
Because some companies require more then one tax, there is a
second tax selection as well. The
Calculate Tax 2 after Tax 1 has been added is mostly for
This Defect Card Percent Discount is only if you give a percent discount on responsibility 3 repairs. If you do, then you must also state if the percentage is based on Labor only or Labor and Material. If you leave this field blank, then the discount rate will always be based on the customers’ hourly rate.
If your company charges taxes to a specific customer or customers, the Customer Profile has a selection where you can select the Tax Type, enter their tax rate and if the tax is based on total labor charged plus total material or if it is based on total labor charged only or material only. Then when you create a quote or billing repair card and you check the box for taxing, the system will automatically calculate the tax rate for the car based on the customer profile and put the appropriate job code in the billing repair card. When you edit a repair card or quote that has the tax box checked, the tax job code does not appear. It will always be with the car and recalculated each time that you add to the billing repair card or quote and save it.
If you delete the tax rate, then the system will verify that there are no quotes or billing repair cards that have taxes associated with it. If it finds any, the system will then remove the tax indicator, but will keep the job code for taxes attached. If you want the job code removed then you must edit the billing repair card or quote and delete the last line for taxes.
The top right side allows you to have the system ask if you want the billing repair or estimate to be in Spanish if checked. Than when you create a BRC or estimate for this specific customer, you will be asked if you want the descriptions to be in Spanich. If you select "YES" when creating the BRC or Estimate, the system will use the translation database for any Rule 83 qualifier and/or AAR or NitLeague Job Code.
When creating a work order, billing repair card or estimate in Spanish, the system will use the Spanish translation, if it is present! If there is no Spanish translation, the system will always use the English description. *See Spanish Translation for more information
You also have the ability to state how each customer prefers to be invoiced. All cars for this customer will be in one invoice or each car will have a separate invoice. One of the requirements, but not mandatory, is to display what your discounted hourly rate is in the data exchange file. If a company requires this information, then check the box, “Show your hourly labor charge in Data Exchange File”.
When creating a data exchange file, you may not want to use the initial that you have designated for that company. Example: You bill some cars to one location and others to another location, however it is the same company that the bills are being sent to. The rolodex file requires that each initial or mark used must be unique. Because of this, you may use XYZ1 for one location and XYZ2 for the other location. You could then go into the customer profile for each of those company’s and state that the initial to use for the road you are billing in the data exchange file is XYZ. It’s that simple!
The check box “DO NOT include in Railinc Files” will allow you to designate each company that you do not want in the Railinc data exchange file when you create it! This only happens when you check the box “Railinc Submitted File” in the data exchange screen when it is based on the Accounting Year/Month.
BRC Instructions lets the system know what to display when entering data or creating data exchange files. If you check the GE format, then the brc entry screen will display the pull-down for Estimate or Supplement as well as the GE Approval Number and GE Supplemental Approval Number entry fields. If you select TTX Format or TTX Format with TTX-UP Format or with SEI 2018 Format, then all the information pertaining to TTX repairs will be displayed on the billing repair card. The same is true when creating a data exchange file. The system will validate what format to use in the data exchange file by checking to see what format you have in the customer profile selected.
The next selection will allow you to state how you want the money to appear on each billing repair card. You can show Labor, Material and Total Amount or you can show only the total amount.
The last entry is the order in which you want the billing repair card to print out in. The order is either Default or Entry order. The default order is by category of repair, then by Location, Job Code, and then Applied Qualifier.
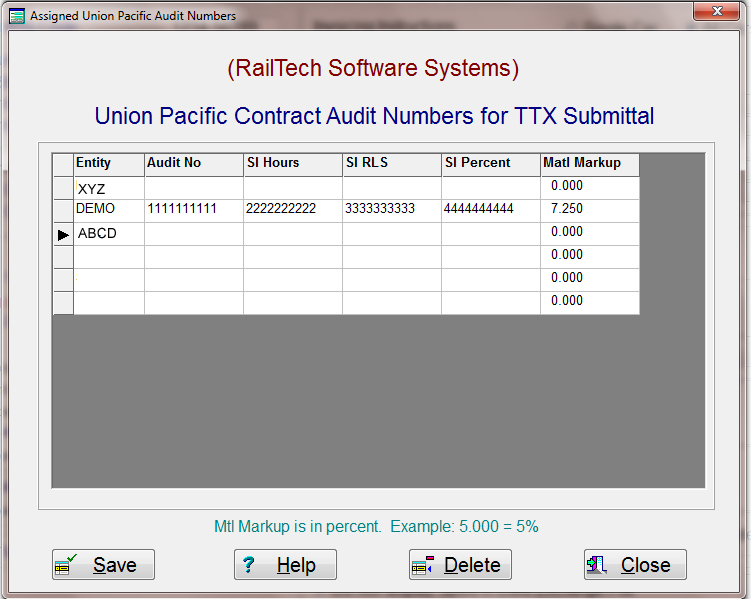
If you have the format set to TTX and TTX_UP, then the push button on the Customer Profile becomes active. When you press that push button the screen above appears. The system will create a unique record, if one does not exist, for each entity that you may have. In most cases this will be only one line for single entity companies. Once you have received the information from the Union Pacific Railroad Company what each Contract Number is, then simply enter those number is the fields above. When you click “Save”, the data will be saved and you will be returned to the customer profile screen. “Close” is the same as abort and does nothing to the data. If a person on network version does not have authority to modify these fields, then the save push button will be inactive.
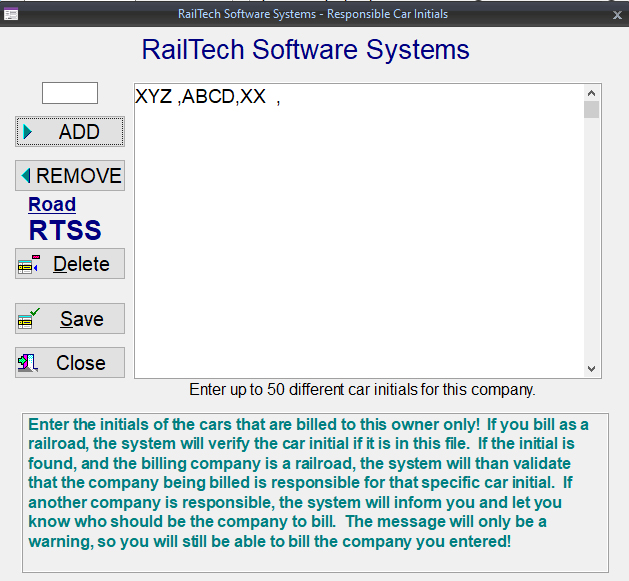
If you have an entity that is a railroad, than you can assign certain car initials to any company. The car initials must be unique for that specific company. When you create a billing repair card, quote estimate or group billing, the system will look to see if the entity that is doing the billing is a railroad and not a shop. If it is a railroad, than the system will look at the assigned car initials that you have entered. If the system finds those initials and the company you are billing is not the company that the initials are assigned to, you will receive a warning. The warning will inform you who you should be billing, but will allow you to still bill the company that you have selected. See the car initials responsibility screen below.
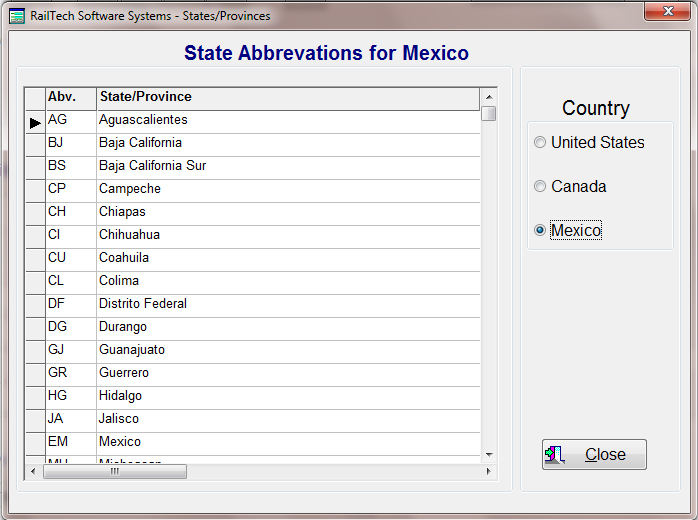
When you press the “State/Province Lookup” push button, the below screen appears. Simple select the country you want and all the States or Provinces will appear along with their abbreviations.
Once you have entered all the information the data will automatically be saved when you return to the rolodex file.
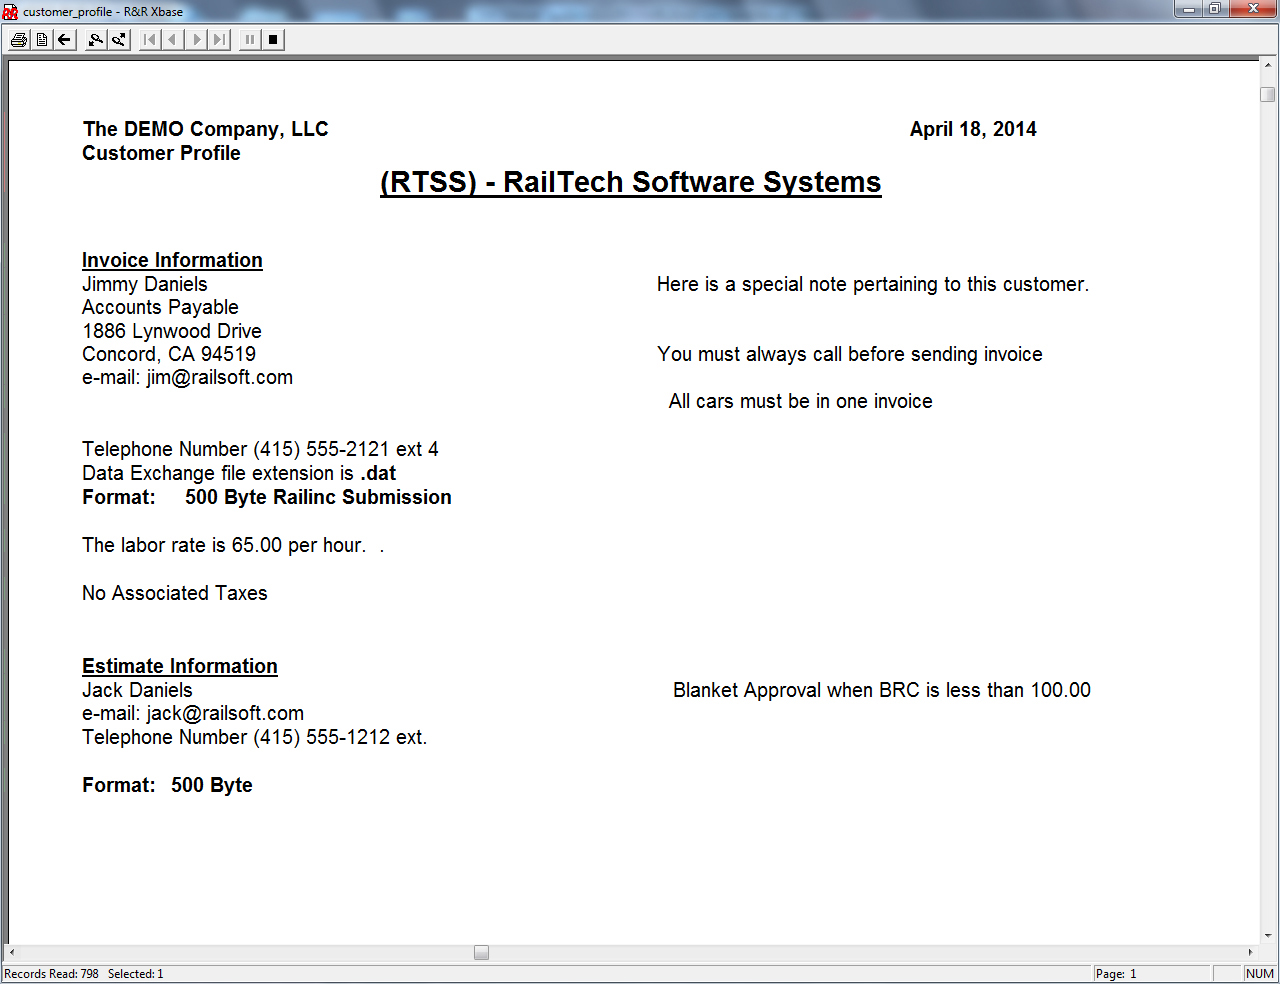
Estimate/Invoice Instructions
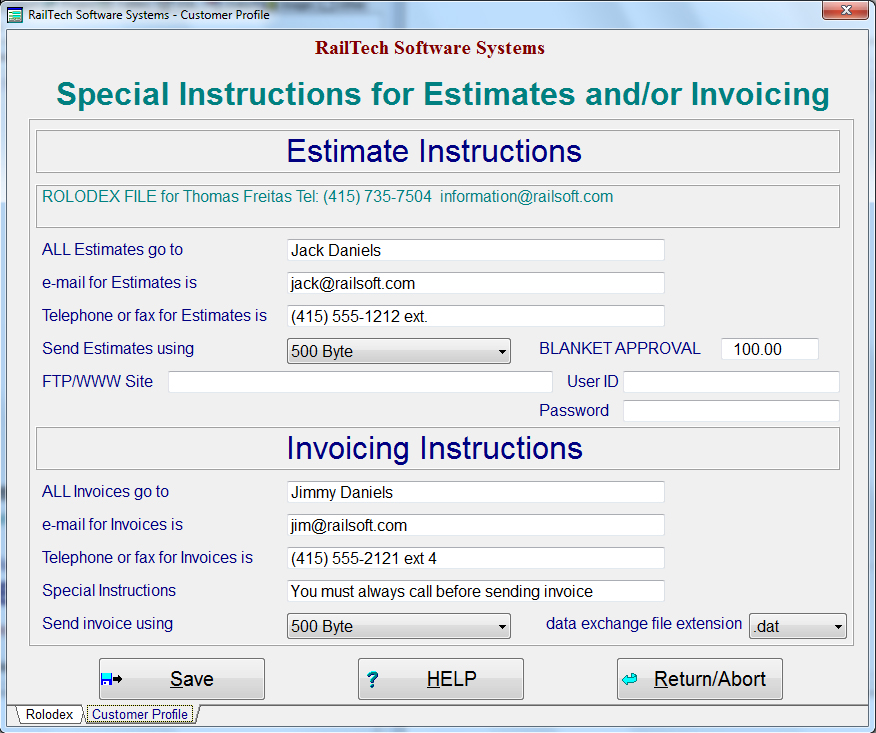
For special instructions on how to send estimates and/or invoices to a customer, use this function. In the Customer Profile of the Rolodex file is a push button Est/Inv Instructions. When you press that push button the above screen appears.
This screen allows you to enter more detailed information on how a customer want to have their estimates and/or invoices sent to them. It also gives you the ability to enter a blanket approval amount. When you save a billing repair card, the system will automatically total the repairs and if the repairs are less than the blanket approval, it will be flagged as being approved.
Once you have completed the form and saved it, all the information will appear on the front page of the rolodex for that specific customer.
If you do not want a specific line to show because the information on the rolodex file covers all for a specific entry, than simply put a period in that field.
You can also run a report in the report screen that will display or print the customer profile for any selection of customers that you want to see. An example of the customer profile for estimates and invoices is below.